Flooring Installation Timeline: What Orlando Homeowners Can Expect From Start to Finish
Planning new floors in Casselberry or nearby Orlando neighborhoods should feel exciting, not confusing. This guide breaks down the full flooring installation timeline so you know what happens, when it happens, and how long each stage typically takes. If you are leaning toward durable, pet-friendly surfaces, many homeowners start with luxury vinyl plank installation because it performs well in our humid climate.
Every home is different, so timing varies by material, room count, subfloor condition, and season. Below, you will see the project steps from first visit to final walkthrough, plus tips on how to prepare your home and what affects how long installation takes in Central Florida.
What A Realistic Timeline Looks Like In Casselberry, FL
From first call to finished floors, most projects follow a similar arc. Homes in Casselberry, Winter Springs, Altamonte Springs, Maitland, and Longwood share the same weather patterns and slab conditions, which can influence moisture checks and scheduling. Here is what a typical sequence looks like for a single-family home.
Step 1: In‑Home Measure And Planning
A design specialist measures rooms, checks transitions and door clearances, and evaluates the subfloor. You will review styles, trims, and the layout pattern. This visit sets expectations and helps the crew bring the right tools and materials on day one.
Step 2: Material Selection And Scheduling
Once you choose material and trim details, the team books your installation window. Lead times vary by availability and the complexity of your layout. Patterns like herringbone hardwood or large-format tile usually need more planning than straight-lay LVP.
Step 3: Acclimation And Pre-Install Prep
Materials often rest in your home before installation so they reach stable temperature and humidity. Timeframes vary by product type and season. In Central Florida’s summer, acclimation can take longer if the home was recently closed up.
Step 4: Subfloor Evaluation And Preparation
The crew verifies flatness, addresses minor dips or high spots, and checks for moisture. Slab homes around Red Bug Lake and Tuscawilla often need careful moisture testing due to our frequent storms. Moisture readings guide the right adhesive and underlayment choice to support a lasting installation.
Step 5: Removal And Disposal
Old flooring and trim come out, then the team disposes of debris. Removing glued-down floors or tile generally takes longer than carpet. The crew protects pathways and ventilation areas to keep your home tidy.
Step 6: Installation Day(s)
Timing depends on square footage, room shapes, and material. LVP usually installs faster than tile; site-finished hardwood is the most time-intensive. The team sets transitions, trims, and undercuts door jambs as needed for a clean look.
Step 7: Final Touches And Walkthrough
Once floors are in, trims and thresholds go on, then the crew completes a detailed cleanup. You will walk the space with your installer, note any touch-ups, and receive care guidance for the first 48 hours.
How Long Installation Takes In Central Florida
It varies by home size, material, subfloor condition, and the time of year. Afternoon storms and humidity in Casselberry and Orlando can influence drying and cure times, especially for adhesives and leveling compounds. Here are common timing factors your installer considers:
- Material type and pattern complexity
- Room count, furniture moves, and stairs
- Subfloor flatness and moisture levels
- Trim, transitions, and door work
- Seasonal humidity and indoor temperature
Keep your HVAC running during and after the project to maintain stable conditions. Consistent temperature and humidity help your floors settle and perform as designed.
Project Steps At A Glance
If you prefer a quick snapshot, this list covers the high-level flow many Casselberry homeowners experience from start to finish:
- Measure and plan, then select materials and book dates
- Acclimate flooring in the home if required
- Prepare subfloor and confirm moisture readings
- Remove old flooring and set surface for installation
- Install new floors, trims, and transitions
- Walkthrough, cleanup, and first 48-hour care
How To Prepare Your Home
Good prep saves time and helps the crew focus on precision. Here is what most homeowners handle before the truck arrives:
Clear the spaces we will work in. Remove small decor, electronics, and anything inside furniture. The crew will coordinate safe moves for larger pieces.
Protect pets and plan access. Set up a quiet space away from open doors and tools. Let neighbors know if you share tight parking or hallways.
Confirm parking and elevator access if you are in a condo, and review any building rules for work hours. In single-family neighborhoods like Winter Park Pines or Weathersfield, note HOA gate codes or parking rules so the crew can arrive on time.
Make sure we have an open path to each room. Clear hallways and stairs so materials and tools can move safely without delays.
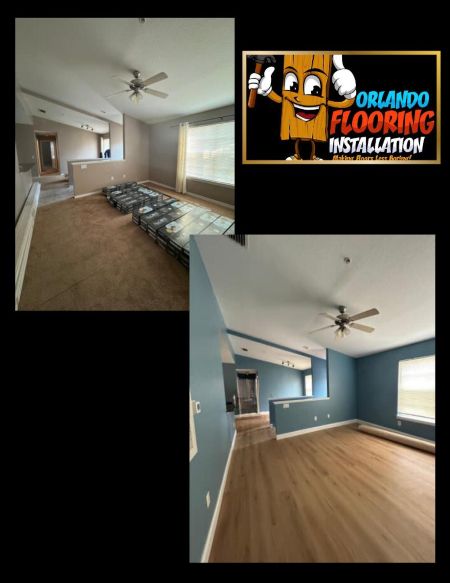
Material Choices: LVP, Tile, And Hardwood
Picking the right surface affects both looks and timeline. LVP handles splashes and quick cleanups well, which is why many families choose it for kitchens and playrooms. If you want water resistance with fast scheduling, ask about lvp flooring options that fit active households.
Tile brings crisp grout lines and heat tolerance, great for bath remodels or sunrooms. To compare styles and layout ideas, explore tile flooring patterns that fit your home’s character.
Classic hardwood offers warmth and long-term value. Prefinished planks reduce site finishing steps compared to site-sanded floors. See design choices and species on our hardwood floors page.
First 48 Hours After Installation
You want your floor to start strong. Follow the care guidance your installer provides. Avoid heavy rolling loads and keep rugs off until the recommended window passes. For wet areas and kitchens, do not wet-mop or steam clean during the initial cure period. Gentle, dry cleaning protects seams and finishes as they set.
If transitions or thresholds were recently installed, give them time before placing weight. Opening windows briefly can help with ventilation, but steady AC control is more important for long-term stability in Casselberry’s climate.
What Can Slow Things Down
Most projects finish on schedule, but the crew will flag anything that could require extra steps. Uneven slabs, hidden moisture, or unusual layouts add time because the team wants a flat, durable surface. If moisture testing shows elevated readings, it is worth addressing before installation so your floors stay stable through summer storms.
Another common delay is finding unexpected layers under old floors. For example, tile over tile or cutback adhesive from past renovations may call for specialty removal and surface prep.
Local Scheduling Tips For Casselberry And Orlando
Central Florida has busy seasons. Spring and late summer often book up fast as families plan around school and holidays. If your timeline is tight, call earlier and be flexible with start dates to get the best crew availability.
Afternoon storms are routine from June through September. Installers plan around this, but a steady indoor climate is still key. Keep doors closed when possible, and remind other contractors on site to do the same so humidity does not spike.
Your Final Walkthrough And Next Steps
Before the team wraps, you will review the finished rooms and note any touch-ups. You will also get care guidance tailored to your material. For many homeowners, the next step is planning the remaining rooms. If the first phase used LVP in the common areas, you might choose tile in baths and keep hardwood in a home office for a quiet, warm feel.
If you want to see samples in person and map out a phased plan, you can start with flooring installation in Casselberry, FL across your whole home, then schedule rooms as time allows.
Why Work With Orlando Flooring Installation
Local experience matters. Our crews work on slab homes across Casselberry, Oviedo, Goldenrod, and the greater Orlando area every week. We understand how weather, slab moisture, and busy family schedules affect real timelines, and we plan around them to keep your project on track.
Expansion gaps, correct adhesives, and clean subfloor prep are non‑negotiable. These details make the difference between floors that look great on day one and floors that still perform years later. We take the time to get it right.
Ready To See Your New Floors?
Let’s map your dates, review the project steps, and set realistic expectations from day one. If you want a fast, family-friendly surface with a great look, explore luxury vinyl plank installation and book your measure today. Call 407-803-9912 to schedule with Orlando Flooring Installation and get your timeline on the calendar.
Unlock the Potential of Your Floors Contact Your Orlando Flooring Company Today!